


Twenty-Something


, as can a small part of the raised air intake to which Rob dedicated three whole days of welding")


When you’re twenty years old and just starting out in challenge events, chances are you dream of one day building the ultimate off-roader. But that’s how old Rob Tunnah is – and he’s just finished building a truck that brought this year’s Donington Show to a near-standstill. This is the story of the Mitsi-Mog – a vehicle many will say is the best Total Off Road has ever featured…
Visitors to the 2008 British Indoor 4x4 Show had a very wide choice of memories to take home with them. The crowds, the banter, the products, the deals and oh, the vehicles, seemingly no end of them jostling for your attention. From the top-notch readers’ rides in the modded display to the gleaming traders’ demo motors and those sexy-as-hell Can-Am quads in the foyer, this more than ever was a show to make 4x4 fanatics drool.
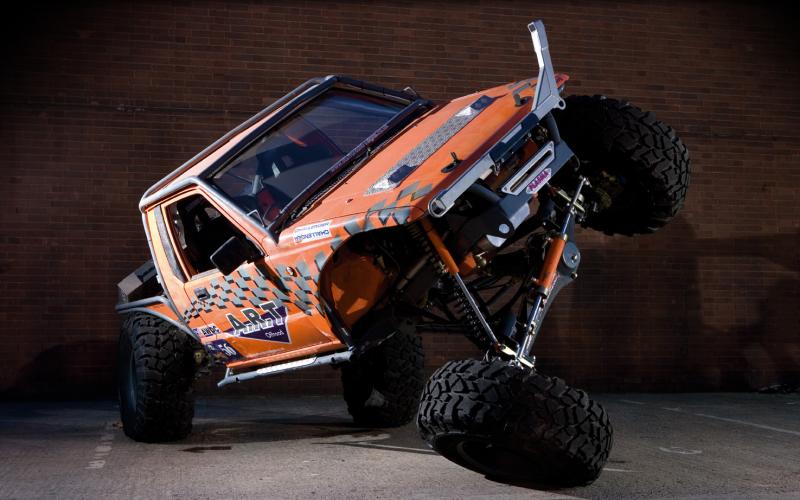
Yet one vehicle quite simply stole the show. An engineering masterpiece presented with the pro-quality finish of a million-pound works WRC car, it was the talk of the event. All day long, it was surrounded by people gaping at it, open-mouthed in admiration. And here it is.
Built for the AWDC Howlin’ Wolf series and other top-level challenge events like it, Rob Tunnah’s sensational new truck threatens to mark a watershed in the development of the sport. Not just because of its mouth-watering technical specification, either. As well as representing one of the best bits of engineering design ever realised in the UK off-road scene, it shows a level of presentation seldom attempted, far less achieved, by even the most fastidious vehicle builders.
That shouldn’t come as any great surprise, however, because Rob learned from one of the masters of vehicle presentation. Andy Tunnah’s name was for many years synonymous with the most beautifully turned-out Class One trialler anyone had ever seen, and after that he went on to repeat the same trick on the comp safari circuit. But his vehicles weren’t just pretty – they were innovative, and they worked. And Rob has followed in his dad’s footsteps there, too.
Having started trialling in a modified Suzuki SJ at the tender age of 16, Rob started thinking about his dream off-road machine a couple of years ago after Andy got interested in challenge events. Both work in the family business, which specialises in high quality fabrication, and that shows right through in the standard of the metalwork on display throughout the vehicle. But even this doesn’t begin to suggest just how much of it is has been made or modified by his own two hands.
Rob, we should point out here, is twenty years old. And although he reaped the benefit of his dad’s wisdom when designing the vehicle, he really has done almost all the work on it himself. Access to a full range of metalworking kit does no harm, of course – but the more time you spend examining this vehicle, the more you come to appreciate the craftsmanship that’s gone into it.
‘After watching the challenges for a couple of years,’ he says, ‘I built this vehicle to try and save a bit of time. I could see what they were doing and I wanted to see if I could try other things. Winching takes most of the time; if you can eliminate winching, you can obviously get more punches in.’
His thinking, then, was to try and drive things rather than winch them. ‘Coming from a trialling background, that’s what we’re used to. I built the vehicle round that concept.’
Base Motor
The vehicle in question is, very loosely speaking indeed, a Mitsubishi L200. As you’ll have spotted, there’s less bodywork on it than there once was, but its major drivetrain components remain along with various other mechanical parts and even a small amount of chassis. About four feet to be precise.
That’s the length of the original chassis rails that remain, holding up the vehicle’s cab. On to this are grafted front and rear extensions made from 4x2-inch, 3mm wall section mild steel, as well as a main crossmember carrying the main front suspension components.
This is interlinked via two tubes to the rear trailing arm mounts, purely for strength. Rob designed the vehicle so that the front axle would be doing most of the hard labour, which is why he linked it to the back to help dissipate the stresses generated in the process. These two tubular braces also act as a mounting position for a belly plate made of 5mm aluminium, which is folded around them and drilled to prevent it retaining too much of the dirt it picks up while being used to let the vehicle slide over things. This can be unbolted and removed for cleaning and to allow access beneath the vehicle, as can the crossmember itself, though this would normally only come off if the gearbox had to be dropped out.
Further forward, the main rails were designed with a certain type of spring in mind. Unfortunately, when they arrived they used a greater diameter of wire than Rob expected, which meant scolloping away the chassis to accommodate them. This has thinned it out quite dramatically, but Rob has reinforced the area with gusset plate and is confident that it doesn’t create a weak point.
On that subject, there aren’t any sacrificial points anywhere on the truck, whether in its frame or driveline. ‘I just built it as strong and as light as I could,’ says Rob. That means a fully kitted weight or around 2300kg – not bad for something with Unimog axles, especially as front-to-rear weight distribution is within 50kg of being even.
Mounted off the main chassis, along with its various crossmembers and outriggers, is a full ten-point roll cage made from 1 3/4” Clubman 500 CDS. This has the usual pair of mounting points ahead of the doors, with four more behind the cab, two at the very back and an additional two at the very front which, in addition to a strut brace between the front shock towers, do a fine job of supporting the bonnet and front wings – the bonnet actually touches the brace when closed, and the point at which it does so is dressed with chequer plate in order to create a hard point for standing on.
The bonnet itself, which is held down by aero-spec retaining pins, is among a very limited amount of the L200’s body to have survived the build. The cab shell remains, of course, as do the windscreen and pedal box, along with what was left after the front wings had been cut down to accommodate a set of 39-inch tyres. That left just about enough for Rob to paint in a hue that was as close as he could find to TNT and B&Q lorries: ‘I always wanted an orange truck,’ he says, ‘and now I’ve got one!’
Axles
The chassis itself is swept dramatically upwards at the back and front alike, the reason being that it had to be high enough to support a set of Unimog 404 axles. These date from around 1966 – just the odd couple of decades more than Rob, then – though you wouldn’t think it to look at them. Refurbished to an incredibly high standard, they really do look as good as new – they’ve been stripped, shot-blasted and painted, treated to all new seals throughout and had their bearings cleaned and their portal cases zinc-plated with gold passivate. This process has been used on a lot of the bracketry and other items Rob fabricated himself for the vehicle, his view being that gold passivate is slightly more weather-resistant than silver – and that it looks better, too. Don’t forget, this is a man with some very high standards of vehicle presentation to live up to…
As well as bringing them back to life, Rob modified the axles very seriously to suit their new application. How serious is serious? Try shortening them by six inches for size…
At the back, the long side of the axle has been shortened to bring the diff close to the vehicle’s centre line, while at the front it’s the other way round, with the short side made even shorter to bring it closer to the nearside wheel. The reason for this is simply for alignment to the transfer box, though obviously having the front diff offset means you’re less likely to drag it along the ground in ruts. The transfer box in question is the original Mitsubishi unit, whose rotation agrees with the axles’ – meaning Rob was spared what would have been the daunting task of turning the diffs over.
Said diffs are the original Unimog variety, which means that as well as being strong enough to shrug off a moderate bomb blast, they’re fitted with lockers. These are rugged, mechanical items which operate on cables and levers from Ox Lockers in the USA; Rob’s toying with the idea of going over to Air-Lockers instead, simply for ease of operation, but stressed that the Mog diffs and Ox kit can’t be faulted for its unbustable reliability.
As an aside, the kit came complete with bracketry for the locker mechanisms. Rob fitted this at both ends, but only the rear now remains; the front unit was going to foul the sump, whose clearance over the diff is minimal as it is, so he had to make one of his own to replace it.
The axles may have come with lockers already in place, but one thing they didn’t have was disc brakes. That’s clearly not the way you want it for challenge events, so a disc conversion was in order. Nothing unusual there, and something plenty of TOR readers will have done themselves… but how many of you have actually made your own discs before? Yes, you read that right. Rob didn’t even stop there, but machined a wavy edge on to the discs rather than leaving them round in an attempt to make them less likely to pick up mud.
Acting on the discs is a set of front calipers from a Suzuki SJ, twinned at the front and single at the back. Go on, how many Suzuki parts did you expect to be reading about in this article? Brought back to life with new seals and repolished pistons, these are basically like new. ‘We thought we’d try it and see how we get on with them,’ says Rob. ‘They seem to be working very well.’
With the original Mitsubishi master cylinder running the show, the brakes are fed via a set of stainless steel braided hoses from Llama 4x4 – whose quality Rob can’t praise highly enough. These run along the tops of the axles beneath plates protecting them from a set of polyurethane bump stops from Britpart.
Sharing the brake hoses’ routing is a set of breathers for the axles’ portal boxes. These run to a single junction on the centre of each axle, which then is then routed to the highest point of the vehicle, by the air filter at the rear of its cab.
But these aren’t just normal breathers. They’re connected to an ARB air compressor in the cab, allowing them to be used as a sort of active system. ‘If we find we’ve got water leaking in,’ says Rob, ‘we can pressurise the breather system with the compressor, maybe to one or two psi, just to keep the water out.’
Another use for the compressor is to air the tyres back up after events, where they tend to run at 3-4psi. The tyres in question are 39.5x16.50R17 Pit Bull Rockers from Straight Forward Supplies, mounted on rims Rob made himself. ‘We struggled to find some rims,’ he explains, ‘so we custom-made these ones. We bought some blank outers and laser cut some centres, then welded them in.’
A split-rim design, the wheels are double beadlocked with a plastic insert, and the tyres are also fitted with inner tubes. Safe to say that the tyres won’t be coming off. The rims are also fitted with valve protectors, so there won’t be any dirt or water getting in either.
Steering
Further mods to the axles include strengthening gussets and corrected castor angles at both ends. Both ends? Oh yes, didn’t we mention the small fact that we’ve been talking about two front axles here? Operating independently of each other, these provide a full range of four-wheel steer options, each using a hydraulic ram to provide steering inputs that brook no argument.
The vehicle’s hydraulic system uses two linked 40-litre tanks, one on each side behind the cab with a 50-litre diesel tank sandwiched between them. A one-inch bore hose runs out of the tank on the right to a 32cc Revolution gear pump, which feeds a valve block fitted to the back of the cab. Returning fluid to the left-hand tank through a two-inch bore hose, this runs front and rear winches, four suspension levers and both steering rams.
The front steering is relatively normal, with the original Mitsubishi column adapted at the bottom to fit a 125cc orbital valve. This is mated to a ZF 74 PAS pump which then operates the custom-made hydraulic ram. Rob fitted this using all his own cups and brackets, and also made the joints and bars, linking them up using standard rose joints.
One disadvantage of hydraulic steering is that it doesn’t self-centre, and the front set-up does indeed have to be constantly controlled by the driver. At the rear, on the other hand, it is controlled by a joystick in the cab which is moved left or right to turn the wheels or forward or back to centre them. This works through two proximity sensors on the axle, which go into four relays and what Rob interestingly describes as ‘a bit of tricky wiring’ to the joystick.
What all this means is that the vehicle can be run with traditional front-only steering, with counter-steering front and rear axles for a minimal turning circle or in ‘crab mode’ with both sets of wheels on the same lock. This latter position, Rob says, is proving very useful for sidling up to punches on challenge events.
Suspension
Having done this, he’s then able to tilt the vehicle’s punch card towards its target using more hydraulic tricks. The truck uses Fox coil-overs all round, 12-inch at the back and 16-inch at the front, and each is integrated with a hydraulic ram to provide extra movement which is, of course, controllable from the cab.
The rams at the rear are eight-inchers, giving what Rob reckons is a total of twenty inches’ overall damping with eight each of normal movement and hydraulic assistance. At the front, the rams are twice as long, to give what he modestly describes as ‘quite a bit of movement.’
Quite a bit? ‘We can lift one wheel six feet in the air with the other three still on the ground.’ The system is designed to work on two pivot points, so that the front can be locked and the body tilted with it while the rear continues to follow the terrain. ‘The front hydraulics, being on the same mounting points as the shocks, normally run in a float position, but flicking the lever backwards into the neutral position locks the front end. If we do happen to drop off a bank or a step with them in neutral, there’s a pair of accumulators on the front shocks to take the impact out of it and act as a bit of suspension as well.’
Getting this sort of travel is relatively easy in terms of spring and shock length, of course. If you can successfully locate your axles to cope with the sort of flexing they’re going to be doing, that’s when you know you’re cooking with gas.
That’s not a reference to gas pipe, of course. The stalwart roll cage material of many a doughty ARC trials truck, you’d never see it on Rob’s machine. Instead, all his suspension uses T45, a 38mm tube with 16-gauge wall thickness which combines enormous strength with neat dimensions and light weight.
Locating the front axle is a set-up Rob describes as being ‘like an upside-down version of a Land Rover’s back end.’ What this means is that it has a lower A-frame and two upper trailing arms.
‘The main reason is to keep the car low’ says Rob. ‘If you keep the A-frame on the bottom, you can reduce the body height, and with the diff being quite big on the Unimog it lets you get the axle further up in the car as well. I’ve never seen it used before, so it was a bit untested, but it seems to work very well.’
Helping it do so is a single spherical bearing at the chassis end, for which Rob machined up retainers to follow radius of the ball for the highest possible angle of movement. The trailing arms are fitted the other way round, with their high-angle joints at the axle; in each case, the opposite end uses basic Land Rover suspension pivots fitted with polyurethane bushes.
The A-frame itself, whose graceful shape makes it look like something you might see in the Tate Gallery, is curved to maintain its height while missing the diff on full articulation. Like the rest of the suspension, it’s twin-tubed and fully seam welded, and the outer members controlling the axle’s movement are kept in place themselves by a pair of elegant cross-braces.
The back axle uses a more traditional A-frame, but here the lack of lower body components means there was no need to locate it underneath. Indeed, here it’s actually better to have it as the first thing to hit the ground: ‘The theory,’ says Rob, ‘is if you hit the front end on something, you can then drag the back over if needs be.’ Once again, of course, he made all the hardware himself and installed it using the same combination of pivots and high-angle spherical joints.
An obvious difference between the two axles is that while the front shocks are set well outboard, at the blunt end they’re a long way inboard. The combination does work for the travel Rob was after, but the main reason for doing it this way was simply to make it all fit. ‘The main problem on the back was trying to get everything in that space,’ he says. ‘When you look underneath a vehicle like this, it doesn’t seem like there’s much there… but to get it all in is a very hard task!’
Drivetrain
So far, everything on the vehicle has been non-standard and custom-made. So it might come as something of a surprise to learn that beneath what’s left of a Mitsubishi bonnet is… a Mitsubishi engine. The self same Mitsubishi engine, in fact, that lived in the donor vehicle, and it’s mated to the same five-speed manual gearbox and two-speed, part-time transfer case.
These might all be original, but they’re not all standard. Compared to the mods elsewhere on the vehicle, the work Rob’s done here might seem fairly light, but it’s still very significant.
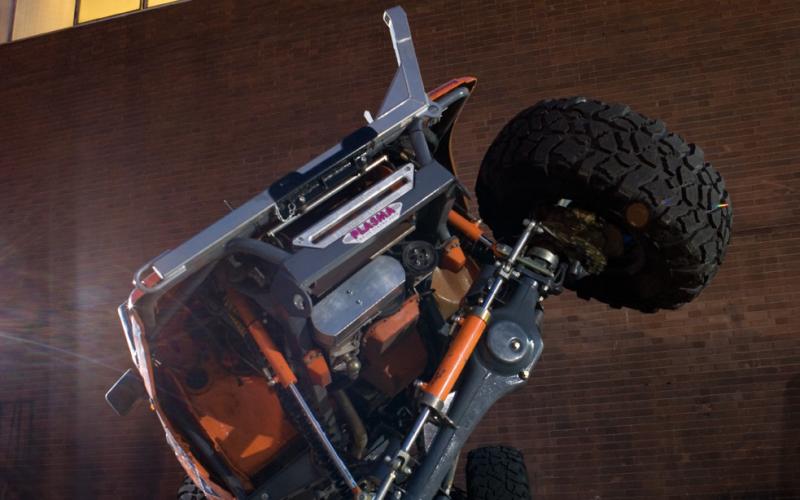
Starting at the front, the engine has had its fuel turned up to get a bit more power out of it. But it’s the air side that’s really interesting, because Rob has created a custom air intake and exhaust to help it breathe as efficiently as possible.
The former in particular is one of those things that make grown men cry. Rob says simply that it ‘runs across the engine bay, into the cab, through the passenger’s side just below the window, up the A-pillar, across the front of the windscreen and down the centre of the roof to the back, then a slight joggle and it exits through the rear window to the air filter.’
Once again, many people reading this will have created something similar, often using a combination of scrap rubber tubing and lengths of drainpipe from Homebase. This, by contrast, is a gleaming piece of work made from a combination of new silicon hose elbows and so many shaped pieces of three-inch ally tube, you quickly lose count of the immaculate welds. Capping it off is an air filter that looks like a K&N copy and which Rob describes as ‘a Halfords’ special, I think!’
At the other end of the engine’s breathing cycle is a straight-through exhaust made from 2.25-inch tube, which exits through the back of the pick up bed and is tipped off with a nice shiny finisher. Also in the back is a Radtech radiator, mounted there to keep it away from the worst of the mud; running twin 13-inch Spal electric fans, it feeds the engine using symmetrical ally pipes which were bent up to run the whole length of the vehicle, following the line of the chassis. Rob says he had specced it to cope with the cooling requirements of a Rover V8, just in case he wants to upgrade the engine, but that he has no plans to follow this route any time in the near future and that the Mitsubishi diesel will get plenty of chance to prove itself first.
The other big change to the engine was the installation of a custom sump, necessary because the L200’s independent front end didn’t require nearly as much clearance as the high-articulation Unimog axle now performing below it. To clear the diff (only just, but a miss is as good as a mile), the sump had to go on the other way round, but as its shape wouldn’t allow that Rob had to make his own, rerouting the strainer and dipstick into the bargain.
So, not a very highly modified engine at all, then… By comparison, the clutch and gearbox really are untouched, though the transfer case has been given a lot of attention to suit. On the standard L200, the sliders are located in the box rather than on the props, but given the length these needed to be to cope with the axles’ vast articulation this had to change. Thus the box (and, incidentally, the diffs) now mate via flanges to a pair of Gwyn Lewis custom props, with extra long sliders and high-angle single-cardon joints.
A further addition to the transfer case is a handbrake, made using an X-Eng caliper and yet another disc from the house of Tunnah. The Unimog that donated its axles didn’t actually have a handbrake at all, and the L200’s was on a back axle that was now resting quietly in the skip, so since they were fitting one from scratch anyway it made sense to put it on the rear output where it would be well out of the way. It’s operated by a cable run to a basic lever by the driver’s door.
Recovery
When you’re going to these lengths to build a vehicle for winch challenges, it stands to reason that you’re going to spend a lot of time on your winches, too. In Rob’s case, that potentially means even more time than normal, as he has not one, not two but three winches to think about.
The front and rear units are Milemarker H12s, fitted with the high-speed Type R motor and running off half-inch hydraulic pipes. That, however, is only half the story – almost literally.
In order to try and combat the eternal problem of bunching, Rob decided to cut the winches’ drums in half and extend them to a length of nearly 450mm, using an extra portion in the middle. This has of course had its welds taken back until you can neither see nor feel them, because any roughness would do no good to the 12mm Plasma both units run. Rob reckons each winch is capable of mounting 220 feet of the stuff, though even the 150 feet he currently has is in his view more than he needs. Remember, the idea is to prevent bunching rather than allowing really long pulls – which aren’t something you want to be getting involved with when time matters, however fast your winches might be. Just in case the front rope does start bunching, a flexible guard at the back of the winch means it won’t come into potentially catastrophic contact with the pulleys on the front of the engine.
Both winches feed out through hawse fairleads which Rob machined out himself from 30mm aluminium. A third hawse, this one circular in shape and facing directly upwards, is mounted on dedicated members running from the roll cage stays behind the cab – the winch here is an electric Warn XD9000m, whose rope can be run in any direction at all to the front, back or either side. As there’s just the one electric winch, Rob satisfied himself with a single dry-type Exide battery to power the whole vehicle.
The front and rear winches are operated by levers linked to the valve block on the back of the cab, and also work on exterior toggle switches which can be isolated by the driver using his master switch. The centre winch, meanwhile, has a switch on the dashboard, and the team also carries a wanderlead should the navigator need to take control of its operation.
Talking of the navigator, the vehicle has a sextet of hooks on its cage’s front hoop and rear stays, as well as in its pick-up bed, specifically to make his life easier. These are for attaching cables before going somewhere deep, so he doesn’t have to dive in to get the rope from its normal position, and it also means the winch doesn’t have to be rendered unusable just because it happens to be jammed up against a bank.
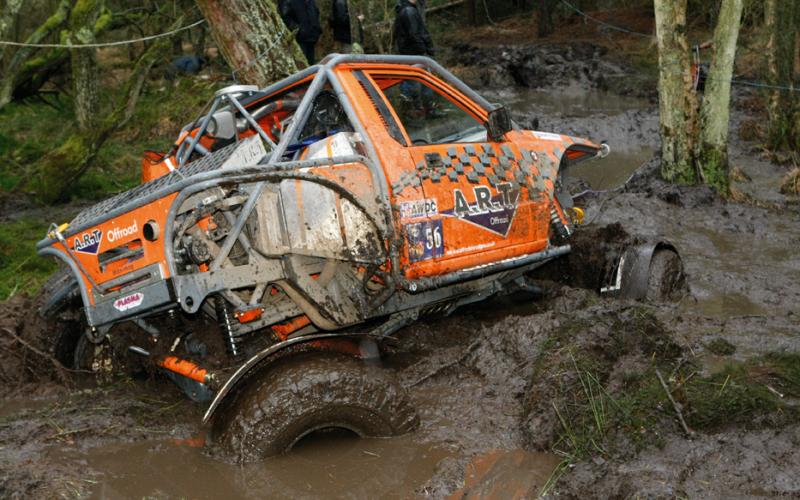
Rob reports that in its first event, Round One of the AWDC Howlin’ Wolf series at Slab Common, navigator Jamie Lewis did indeed have to use the winches quite frequently (even before the vehicle got so incredibly stuck, at once stage the team thought they were going to have to leave it there overnight). One thing he didn’t have to break out, however, was the Devon 4x4 ground anchor whose head and frame are carried on the back stays and front bumper respectively.
Neither were the waffle boards carried in a home-made cradle over the pick-up bed, though needless to say it’s only a matter of time. Interestingly, even the waffles themselves are Rob’s own work – rather than going for a branded item, he got a load of lengths direct from a manufacturer and cut them up to suit.
How much of a surprise would it be, then, to learn that he’s in the process of making his own ground anchor too? This is going to be made from aluminium, and will thus be much lighter and easier to handle than the normal steel variety – getting the vehicle ready for the start of the championship was his priority, of course (as was repairing it after that big stuck moment left it with bent front steering), but the anchor is slated for testing soon and should then be taking the place of what may well be a still-unused D44 item for the remainder of the season.
Something the vehicle doesn’t carry, which many off-roaders would consider to be the very first item on their must-have list, is a high-lift jack. This is despite a series of sockets in the side steps which look as if they were put there specifically for that purpose. These, however, are designed to accommodate a set of stands for wheel changing: Rob raises the hydraulics, loads the stands then drops the hydraulics again, bringing the wheels off the ground. Ideal for changing punctures or, more commonly, checking wheel bearings. As for a high-lift, with so much other recovery gear on board he’s decided it’s simply not worth carrying the extra weight.
Inside
As you’d expect of a competition truck, inside the vehicle it’s all very basic and very functional. That doesn’t mean it’s without its comforts, though – the Corbeau Sprint vinyl buckets are on custom mounts which make them adjustable for height, tilt and legroom, and the original heater is still in place, albeit mainly to demist the screen rather than keep two hard-working occupants feeling toasty.
The dash is a very simple, easy-to-clean affair in which all the controls are set for ease of access, while the levers for the suspension, winches, lockers and rear steering are positioned between the seats where either team member can operate them. The valve block’s positioning on the back of the cab means that while it’s mounted inside, all the high-pressure hoses running to it are outside where there’s less danger of someone copping it if one of them decides to let go.
Joining it behind the seats are an AFFF fire extinguisher, the Exide battery and ARB air compressor and a couple of electric boxes installed by the auto electrician Rob employed to wire the vehicle. The whole loom was created without a single fuse anywhere in the vehicle – it’s all on circuit breakers, so that if something trips out they can just reset it and carry on.
The kill switches, meanwhile, are a new push-button type which Rob decided to try out. There’s one on the dash and another on top of the bonnet, and both are over-ridden by a reset button in the cab just in case either is pressed by accident.
What now?
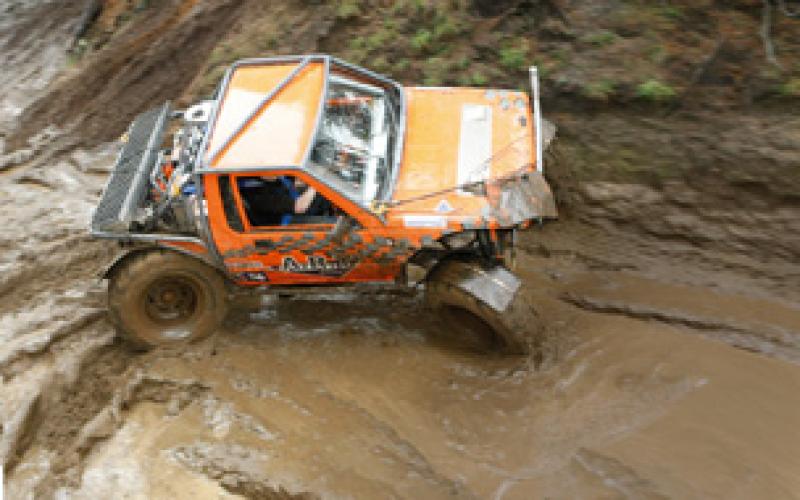
After its triumphant public unveiling at Donington in February, the vehicle made its competitive debut at Slab the following month. ‘The first event was mainly just to try it out and make sure we didn’t have any problems,’ says Rob. ‘Apart from taking it in and out of Donington and a couple of times round the yard, I’d never driven it before.
‘I didn’t want to push the vehicle to its limit on the first event, just in case something did go, and I had no problems at all. It went very well… up until the punch where we got very stuck. I think we were about four foot under – all the suspension was jacked down, we had all three winches out together and we were stalling them on a double line pull. It was very, very stuck, which in turn bent the front steering. We couldn’t see anything, it was so far under, but I believe there were some tree stumps under there and we were pulling against those – that’s what bent it.’
Future events will see Rob learning more and more about the vehicle and how to get the best from it – and you can bet your bottom dollar that they’ll also start featuring his name among the leaders. But what’s most remarkable isn’t what it’s going to be doing off-road – yes, Rob actually plans to get it registered for the Queen’s highway.
‘I believe it’s only the Howlin’ Wolf where you don’t need to be road registered,’ he says. ‘And as I plan to do other events as well, we’re looking to get it road legal.
‘I believe that you can go for a daytime MOT, which is dusk until dawn, so I don’t believe lights are needed. After that, there’s only a few other requirements.’
It’s hard to believe that such a radical off-road machine could actually, in theory at least, be used to cruise up the King’s Road or pop round to Tesco for the groceries. But once you’ve got past your disbelief at a twenty year old building something like this in the first place, nothing seems that strange any more. Rob Tunnah didn’t spend the last couple of his teenage years in the workshop for nothing.
PIT BULL ROCKERS, ART OFF ROAD SPACEFRAME, UNIMOG AXLES, FOUR-WHEEL STEER, CUSTOM SUSPENSION ARMS, HYDRAULIC SUSPENSION, MILEMARKER H12, FOX COIL-OVERS


